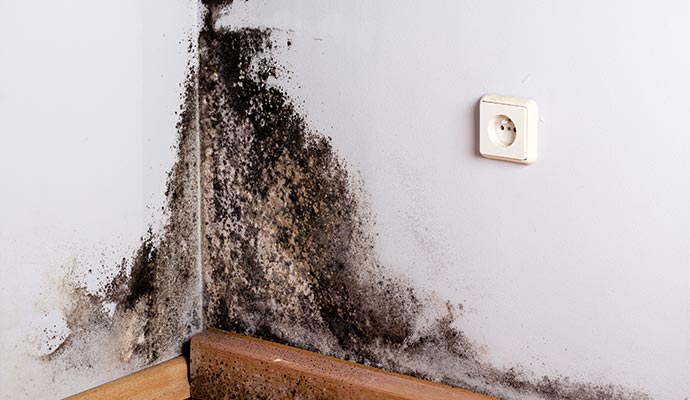
Black mold, scientifically known as Stachybotrys chartarum, is a type of fungal growth commonly found in damp or water-damaged environments. It is characterized by its dark green or black appearance and thrives on materials rich in cellulose, such as wood, drywall, and paper. Identifying black mold early is crucial to prevent health-related risks and structural damage to your property.
Effective Mold Remediation Deltona FL: Identifying Black Mold Characteristics
- Color: Dark green, black, or grayish-black patches.
- Texture: Slimy or wet when active; powdery when dried out.
- Odor: Musty or earthy smell often associated with damp environments.
Distinguishing black mold from other types of molds requires careful observation. While not all dark molds are toxic, it’s essential to treat any suspected growth seriously.
Identifying Common Areas for Black Mold in Deltona FL
- Bathrooms (behind tiles, shower curtains)
- Kitchens (under sinks, near leaky pipes)
- Basements (on walls, ceilings, or stored items)
- Around windowsills where condensation accumulates
- Attics (especially near roof leaks)
Regularly inspecting these locations helps ensure you catch potential problems early.
How to Identify Black Mold
- Look for dark stains or spots on surfaces prone to moisture exposure.
- Check hidden areas such as under carpets or behind walls if there’s a history of water damage.
- A persistent musty odor can indicate the presence of mold colonies even if they’re not visible initially.
- Use a moisture meter to detect dampness in walls and floors that may contribute to mold growth.
- If you suspect black mold but are uncertain, consider professional testing services that can confirm its presence through samples analyzed in laboratory conditions.
| Identification Method | Purpose | Tools Required |
| Visual Inspection | Spot visible colonies | Flashlight |
| Smell Detection | Detect hidden infestations | None |
| Moisture Testing | Locate damp areas | Moisture meter |
| Professional Testing | Confirm type of mold | Laboratory services |
When Should You Seek Professional Mold Testing Deltona FL?
- The affected area exceeds 10 square feet.
- The infestation is located in HVAC systems or hard-to-reach places.
- Persistent health symptoms like allergies worsen after exposure.
By understanding what black mold looks like and where it thrives, homeowners can take proactive measures to mitigate its risks effectively while maintaining a safe living environment.
Finding the Best Mold Removal Company Deltona FL for Safe and Effective Black Mold Solutions
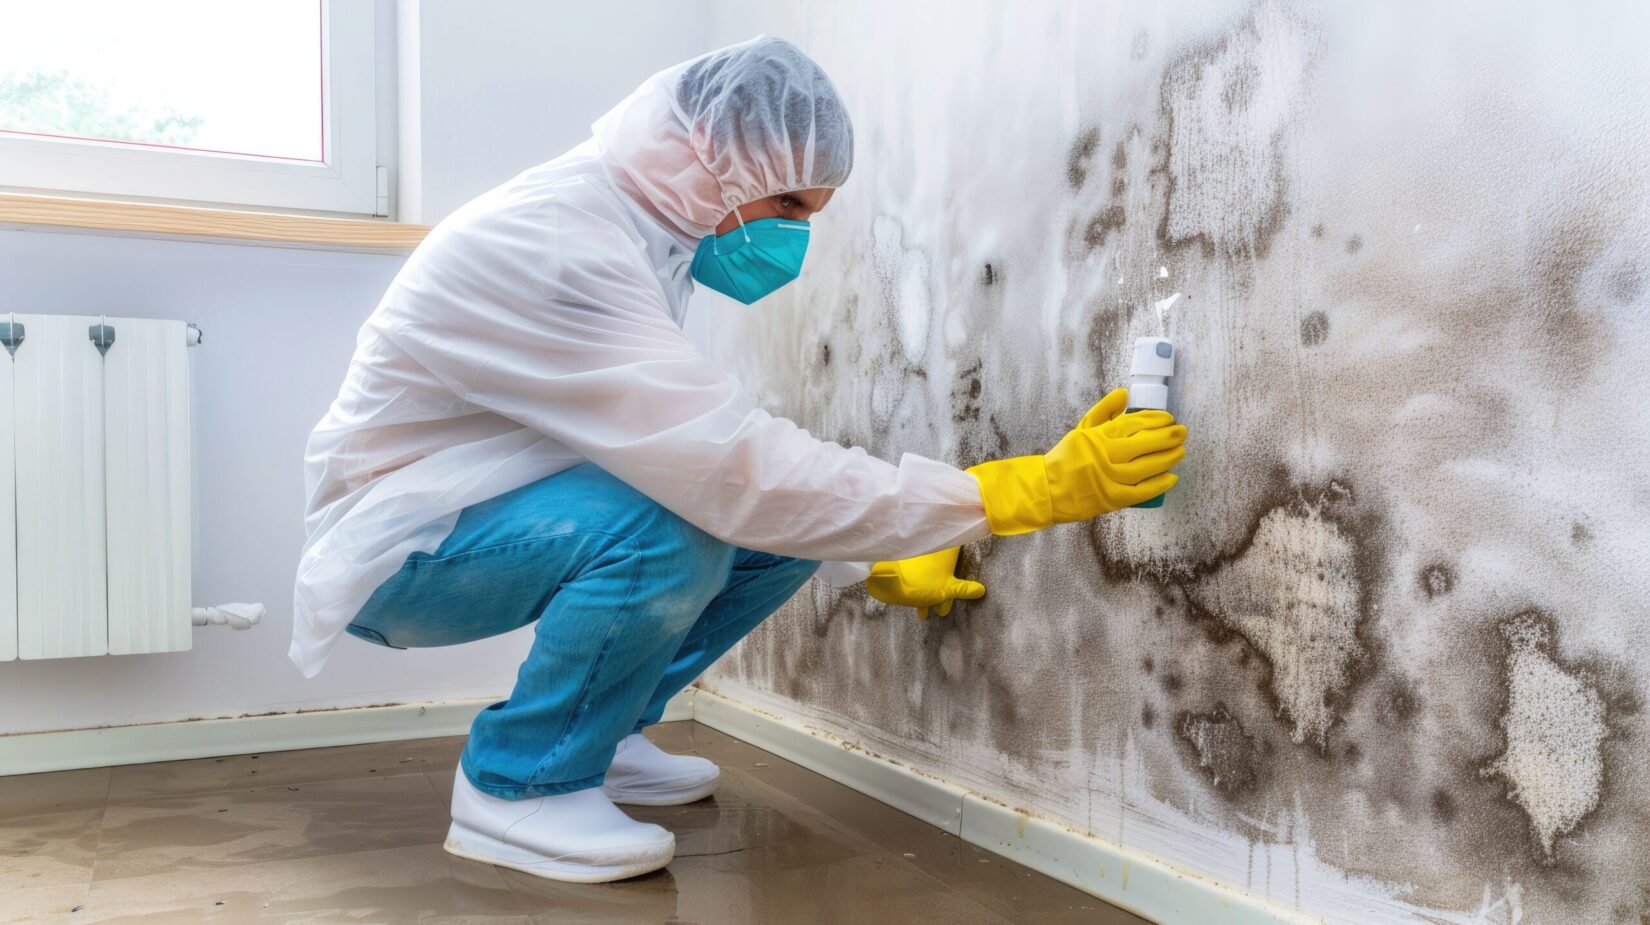
Removing black mold from your home requires a combination of proper techniques, safety precautions, and the right tools. Black mold can pose significant health risks, so handling it with care is essential. Below is a detailed guide outlining effective and safe methods for removing black mold.
Safety Precautions Before Removal
- Gloves (preferably non-porous or rubber gloves)
- N95 respirator mask or similar
- Safety goggles without ventilation holes
- Long-sleeved clothing and pants that can be washed or discarded after use
- Seal off the room by closing doors and covering vents with plastic sheeting.
- Use duct tape to secure the plastic covers to prevent mold spores from spreading.
- Open windows where possible.
- Avoid using fans as they can spread spores throughout your home.
Materials and Tools You’ll Need
| Tool/Material | Purpose |
| Scrub brush | To scrub away visible mold colonies |
| Spray bottle | For applying cleaning solutions |
| HEPA vacuum | To clean up loose spores post-removal |
| Disposable rags or cloths | For wiping surfaces |
| Household detergent | For general cleaning before treatment |
| Mold-killing agent | Such as hydrogen peroxide (3%) or white vinegar |
| Plastic bags | To safely dispose of contaminated materials |
Steps for Effective Black Mold Removal
- Assess the Extent of Contamination: Inspect the affected areas thoroughly. If the mold covers more than 10 square feet, consider hiring a professional remediation service as large-scale infestations may require advanced equipment.
- Prepare a Cleaning Solution: Choose an appropriate cleaning solution:
- Mix one part hydrogen peroxide with two parts water.
- Alternatively, undiluted white vinegar can be effective against many mold strains.
- Spray the solution generously over the affected area.
- Allow it to sit for at least 10–15 minutes so it can penetrate into porous surfaces.
- Scrub Away Visible Mold: Use a stiff-bristled brush to scrub away visible mold growth while applying even pressure. Rinse your brush regularly during this process.
- Remove Excess Moisture: Wipe down cleaned surfaces with disposable rags or absorbent towels to remove moisture. Dispose of used cloths directly into sealed plastic bags.
- HEPA Vacuuming: After scrubbing and drying, use a HEPA-filter vacuum cleaner on nearby surfaces to pick up any remaining spores that may not be visible to the naked eye.
- Dispose of Contaminated Materials Safely: Place all used protective gear (gloves, masks) and cleaning materials into tightly sealed garbage bags for disposal in an outdoor waste bin.
- Monitor for Recurrence: Keep an eye on treated areas over time for signs of new growth and address any underlying moisture issues immediately (e.g., leaks).
Tips for Preventing Mold Growth After Removal
To minimize future occurrences: – Fix water leaks promptly. – Improve indoor ventilation by using exhaust fans in kitchens and bathrooms. – Maintain indoor humidity levels below 50% using dehumidifiers if necessary.
By following these steps carefully, you can effectively remove black mold while ensuring safety at every stage of the process.
How to Remove Black Mold Using Effective and Safe Methods
Removing black mold from your home is a crucial step in ensuring a safe and healthy living environment. Black mold, often identified as Stachybotrys chartarum, thrives in damp areas and can cause significant health risks when left untreated. Below are effective and safe methods for eliminating black mold, minimizing its reappearance, and protecting your household.
Steps for Removing Black Mold Safely
- Identify the extent of the mold growth.
- Determine whether it’s safe to clean it yourself or if professional help is required (e.g., for extensive infestations over 10 square feet).
- Gather Protective Gear
Before beginning removal, wear appropriate personal protective equipment (PPE) to avoid exposure: - N95 respirator mask or higher-grade mask
- Non-porous gloves (e.g., rubber or nitrile)
- Protective goggles without ventilation holes
- Long-sleeved clothing that can be washed or discarded afterward
- Contain the Mold Area
Prevent spores from spreading by: - Sealing doors and vents using plastic sheeting and tape.
- Using an exhaust fan to direct airflow outside.
- Prepare Cleaning Solutions
Choose one of these commonly used cleaning agents based on the surface type:
| Cleaning Solution | Application Notes |
| Bleach Solution (1 cup bleach + 1 gallon water) | Use for non-porous surfaces like tiles and glass; do not mix with ammonia-based cleaners. |
| White Vinegar | Spray undiluted onto affected areas; suitable for porous materials like drywall or wood. |
| Baking Soda Mixture (1 tsp baking soda + 2 cups water) | Gentle cleaner ideal for small areas of growth on various surfaces. |
- Remove the Mold
Follow these steps carefully: - Scrub affected non-porous surfaces with your selected cleaning solution using a sponge or brush.
- For porous materials like drywall, removal may be necessary as mold often penetrates deeply.
- Avoid excessive water during cleaning as moisture can promote further growth.
- Dry the Area Thoroughly
After cleaning, use fans, dehumidifiers, or open windows to ensure surfaces dry completely within 24-48 hours. - Dispose of Contaminated Materials Properly
Place any discarded materials such as drywall pieces, rags, or heavily contaminated furniture into heavy-duty trash bags immediately after removal.
Preventative Measures After Removal
- Fix leaks promptly in plumbing, roofing, or other areas prone to water intrusion.
- Use dehumidifiers in high-humidity zones (e.g., bathrooms).
- Ensure proper ventilation by installing exhaust fans in moisture-prone spaces.
- Regularly inspect areas susceptible to dampness such as basements and kitchens.
By following these steps thoroughly, you can effectively eliminate black mold from your home while safeguarding your health during the process.
How to Remove Black Mold Using Effective and Safe Methods
Removing black mold from your home requires a methodical and safe approach to ensure the health of occupants and the complete elimination of the mold. This process involves preparation, using appropriate cleaning methods, and taking precautions to prevent its recurrence. Below is a detailed guide on how to safely remove black mold.
1. Prepare for Mold Removal
- Assess the Area: Determine the extent of the infestation. Small areas (less than 10 square feet) can typically be handled on your own, while larger infestations may require professional assistance.
- Wear Protective Gear: To protect yourself from harmful spores, wear:
- N95 respirator or better
- Rubber gloves
- Safety goggles
- Isolate the Affected Area: Seal off doors and air vents to contain mold spores during cleaning. Use plastic sheeting if necessary.
- Turn Off HVAC Systems: Prevent the spread of spores through air circulation by shutting off heating or cooling systems.
2. Gather Essential Cleaning Supplies
| Cleaning Supplies | Purpose |
| Bleach (or alternatives like vinegar) | Disinfects hard surfaces |
| Detergent/soap | Cleans dirt and debris |
| Scrub brushes/sponges | Used for scrubbing away visible mold |
| Microfiber cloths | Wipes down surfaces without spreading spores |
| HEPA vacuum cleaner | Removes loose spores post-cleaning |
3. Cleaning Small Areas with Black Mold
- Mix a cleaning solution (e.g., one cup of bleach diluted in one gallon of water).
- Use a scrub brush or sponge to clean all affected surfaces thoroughly.
- Avoid dry scrubbing as it may release spores into the air.
- Wipe cleaned areas with a damp cloth soaked in clean water.
- Allow surfaces to air-dry completely before proceeding.
- Remove porous items like carpets, insulation, or drywall if heavily contaminated.
- Place these materials in sealed plastic bags for proper disposal.
4. Address Larger Infestations Safely
- Consider hiring certified professionals trained in mold remediation.
- Professionals use specialized equipment such as negative air machines, industrial-strength cleaners, and protective barriers to ensure thorough removal.
5. Preventing Mold Regrowth
- Control Humidity Levels: Use dehumidifiers and maintain indoor humidity below 50%.
- Fix Leaks Promptly: Inspect pipes, roofs, and windows regularly for leaks.
- Promote Ventilation: Ensure adequate airflow in bathrooms, kitchens, basements, and other moisture-prone areas.
- Inspect Regularly: Check hidden spots such as under sinks or behind appliances where moisture may accumulate.
By following these guidelines thoughtfully and carefully, homeowners can effectively eliminate black mold while reducing risks associated with exposure.
Understanding the Steps in an 8-Step Mold Remediation Process
1. Inspection and Assessment
The first step in any mold remediation process is to thoroughly inspect the affected area. This includes:
– Identifying visible mold growth.
– Assessing hidden areas where moisture may have encouraged mold growth, such as inside walls or beneath floorboards.
– Using tools like moisture meters and thermal imaging cameras to detect dampness that fosters mold development.
A comprehensive inspection helps determine the scope of the problem and informs the next steps.
2. Containment of Affected Areas
To prevent mold spores from spreading to other parts of the property, containment measures are implemented:
– Use of plastic sheeting to seal off contaminated areas.
– Application of negative air pressure systems to isolate airflow within the space.
This step minimizes cross-contamination during removal activities.
3. Air Filtration and Purification
Air filtration devices equipped with HEPA filters are used to capture airborne spores, dust, and other particulates that could spread further contamination. In some cases, industrial-grade air scrubbers or dehumidifiers are employed for better efficiency.
4. Removal of Mold-Affected Materials
Non-salvageable materials such as drywall, insulation, carpets, or furniture must be removed and properly disposed of according to local regulations. Salvageable items can often be cleaned using specific cleaning agents designed for fungal removal.
5. Cleaning Surfaces with Specialized Solutions
- Hard Surfaces: Scrubbed using detergent solutions or antimicrobial treatments designed for killing mold spores.
- Porous Materials: Treated differently based on severity; minor contamination may allow cleaning with special fungicides, while heavy infestation often requires disposal.
Proper cleaning ensures no active spores remain that could potentially regrow.
| Material Type | Cleaning Method | Disposal Required? |
| Drywall | Remove if infected | Yes |
| Wood | Sand & seal if possible | No |
| Upholstery etc |
How to Test for Black Mold: Methods and Tools Explained
Testing for black mold is a critical step in safeguarding your home and health. Identifying the presence of mold early allows you to address the issue promptly, preventing structural damage and potential health risks. Below, we’ll explore different methods and tools used to test for black mold effectively.
Visual Inspection
- Color: Black mold is usually dark green or black in color.
- Texture: It may appear slimy or fuzzy depending on the surface it grows on.
- Location: Common areas include walls, ceilings, grout lines, HVAC systems, and under sinks.
- Odor: A musty smell can indicate hidden mold growth.
While a visual inspection can help identify obvious mold colonies, not all infestations are visible. For hidden mold issues, additional testing methods are required.
Air Sampling
Air sampling involves collecting air from inside your home and analyzing it for mold spores. This method is particularly useful if you suspect a hidden infestation or want to assess indoor air quality.
Key tools used in air sampling: – Spore traps: Devices that capture airborne particles on a sticky surface. – Laboratory analysis: Samples are sent to a lab where experts identify the type and concentration of spores present.
Pros: – Provides an accurate assessment of airborne spore levels. – Useful for identifying unseen or dormant infestations.
Cons: – Requires professional equipment or services. – May not pinpoint the exact location of the mold source.
Surface Testing
Surface testing involves swabbing or tape-lifting samples from suspected areas of contamination. This method directly analyzes physical surfaces for visible signs of black mold.
Steps involved: 1. Use a sterile swab or tape lift to collect material from affected areas. 2. Place the sample in a sealed container provided by a testing lab. 3. Send it for laboratory analysis to confirm if the substance is indeed black mold.
Advantages: – Useful for targeted testing of specific surfaces (e.g., drywall, furniture). – Confirms whether visible growth is toxic black mold or another type of fungus.
Limitations: – Does not measure airborne spore concentration. – Limited scope; only tests specific locations sampled.
DIY Mold Test Kits
For homeowners looking for cost-effective solutions, DIY mold test kits are readily available at hardware stores and online retailers. These kits contain materials necessary to test samples either by sending them to a lab or through at-home analysis.
Popular types of test kits include: | Type | Description | Cost Range | |———————–|————————————————————–|—————| | Petri Dish Kits | Collect spores on agar plates placed in your home | $10 – $30 | | Tape Lift Tests | Adhesive strips collect samples from surfaces | $15 – $40 | | Lab Submission Kits | Prepaid envelopes allow you to send samples to certified labs| $20 – $60 |
While DIY kits are convenient and affordable, they might lack precision compared to professional services. For severe infestations or persistent issues, expert intervention should be considered.
Professional Mold Testing Services
Hiring certified professionals ensures thorough testing using advanced tools like thermal imaging cameras and moisture meters. Professionals can also interpret results accurately while recommending appropriate remediation steps based on findings.
Benefits include: – Comprehensive assessment across multiple areas (visible & hidden). – Tailored remediation plans backed by scientific data.
Costs vary widely depending on property size but typically range between $300-$800 per inspection.
Effective testing methods depend on factors like budget constraints, severity of suspected contamination, and whether professional expertise is needed. Always prioritize safety when dealing with potential exposure risks by using proper PPE (e.g., gloves, masks) during inspections or sample collection processes. A proactive approach ensures peace of mind while maintaining healthy living spaces free from harmful mold growths.
- The Importance of Prompt Mold Removal Deltona FL to Protect Your Home
- Mold Removal Deltona FL: How to Spot It After Water Damage and Prevent Future Issues
- Mold Removal Deltona FL: Understanding the Difference Between Abatement and Remediation
- What to Expect During Mold Remediation in Deltona FL and How Much It Costs
- Effective Mold Remediation Deltona FL: 3 Signs of Black Mold and How to Remove It
- Essential Tips for Mold Inspection Deltona FL: How to Spot Black Mold and Expert Tips for Mold Removal Deltona FL
- How to Determine If You Need Mold Removal Deltona FL Services
- Understanding Mold Remediation Deltona FL: Key Differences from Mold Removal
- Understanding Mold Removal Deltona FL: Costs and Key Factors to Consider